
Nature’s Head Composting Toilet Installation

Nature’s Head Composting Toilet and pee funnel
*Disclaimer: This post contains affiliate links. If you choose to make a purchase using one of our affiliate links, we will make a commission at no additional cost to you. Thank you for your support!
When we initially planned our camper van layout, we knew we wanted a toilet in our van and not be 100% reliant on public restrooms. After researching different types of toilets, we chose to install a Nature’s Head Composting Toilet and pee funnel in our van. We chose to install these in our convertible shower, so we had to build our shower before installing the toilet.
We love having a composting toilet for multiple reasons. The first is the Nature’s Head Composting Toilet is easy to move in and out of the shower which we need to do when we use the shower. We also liked that we wouldn’t have to empty the toilet as frequently as other options and no odor comes from the toilet. A bonus is it’s an environmentally friendly option.
Jess has an additional option she can use when she has to pee, a pee funnel. The pee funnel is attached to a tube that goes through the floor of the van to the outside. When we are in areas where you can pee outside and our tank is getting full, this is an easy option for her.
For a full overview of different types of toilets for your camper van, check out our post comparing the best toilets for van life.
Nature’s Head Composting Toilet Installation
Since we have a convertible shower, anytime we shower the toilet must come out. Our design makes this process as easy as possible.
When we installed the convertible shower we left an access hole to feed the power cord for the toilet, the exhaust for the toilet, and the pee funnel through the hole so it was out of the way to shower.
When you open the Nature’s Head box, you will find the toilet and a bag inside the toilet with parts. The top of the toilet can easily be slid onto the hinge if it’s not connected. We then set the toilet inside the shower pan to see how it would fit. With the toilet inside the shower pan, we determined which side to put the agitator handle on. We placed it on the side that would be closest to the bench since we had more room to turn the handle on that side.
Nature’s Head Vent Installation

Exhaust hose attached to toilet
The Nature’s Head Toilet comes with an exhaust hose. This is attached to the side of our toilet closest to the front of the van. This is also the side that has the exhaust fan. The fan is made to be reversible if you are using the opposite side for your hose and is very easy to move.
The hose is then passed through the access hole in the wall and will exit the van through the floor under the sink. The hose is a 1 1/2 inch ID hose. We decided where the hose was going to go through the floor based on the position of our gray water jugs and obstructions below the van. We then used a 2 1/8 inch hole saw and drilled through the floor. Use a mask and eye protection for this. Use a deburring tool on sharp metal edges from the hole. Then use spray paint to seal the metal.
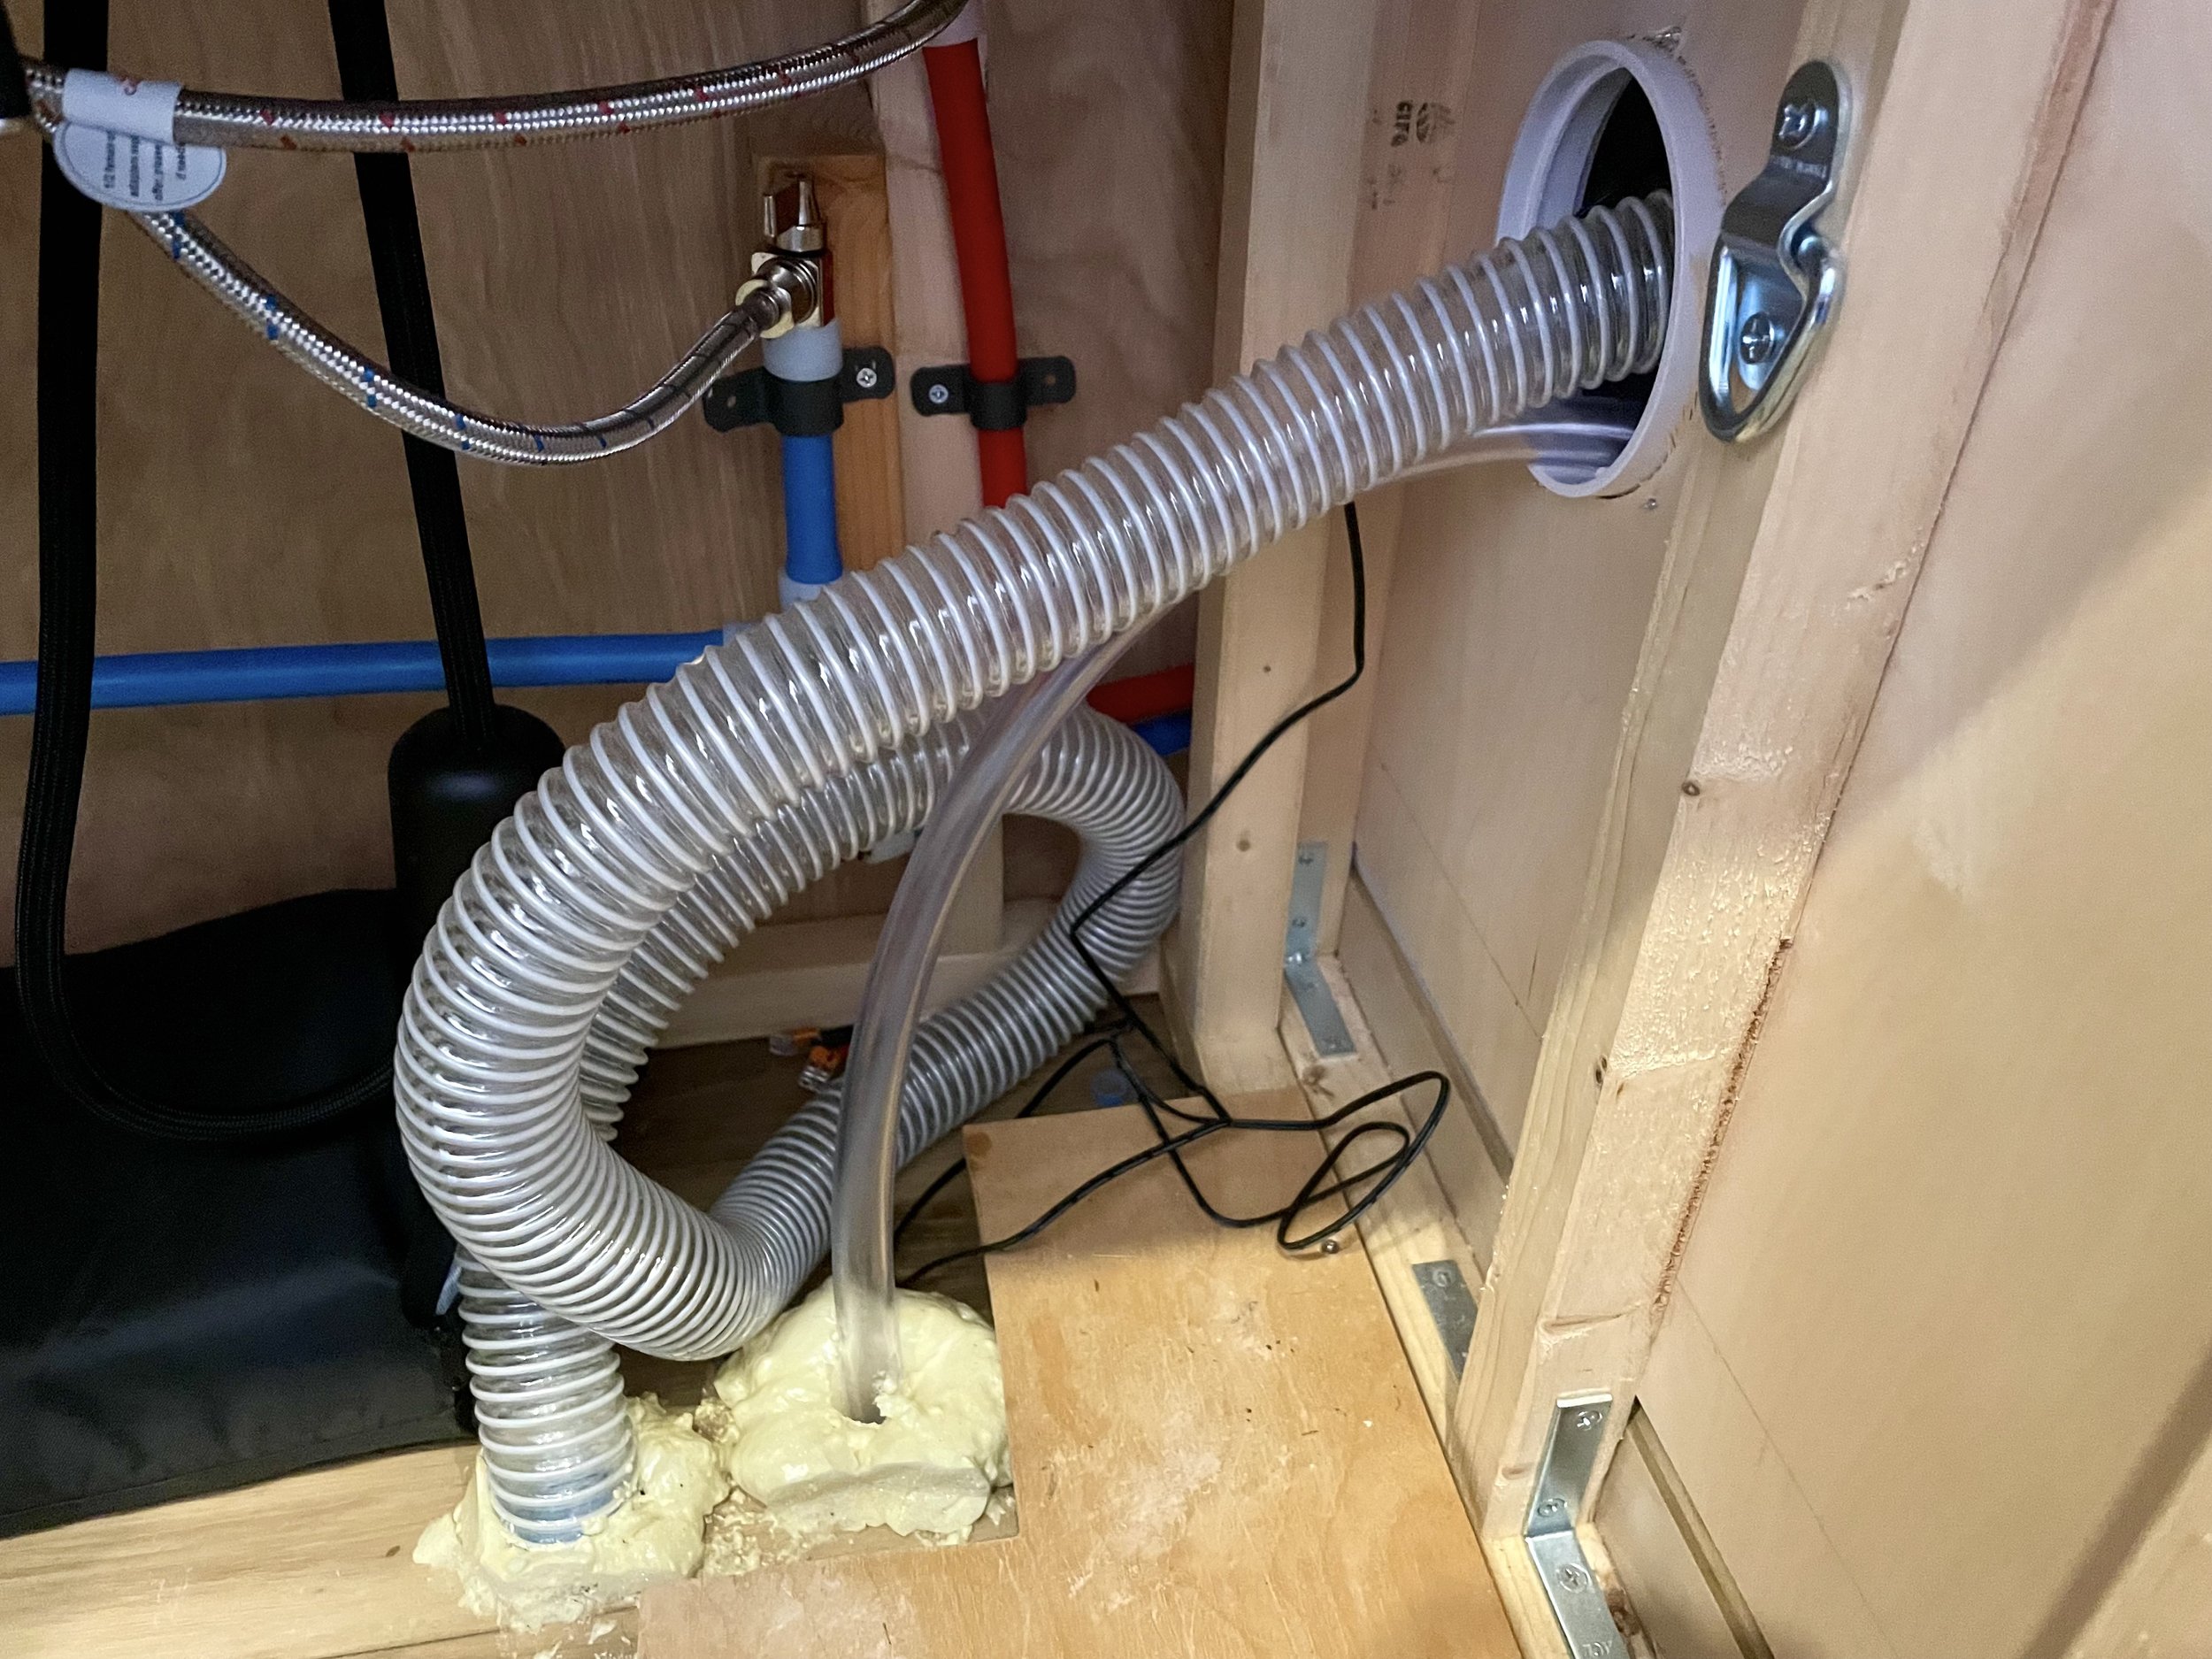
Exhaust hose and pee funnel going outside
Once the paint has dried, connect the exhaust hose to the toilet in the shower. Run the hose through the hole in the shower wall and the hole in the floor. The toilet came with a vent flange which we will now use. Nature’s Head instructs the vent flange to be placed on the inside and a shell vent on the outside. Instead we took the vent flange under the van and connected it to the exhaust hose that had been placed through the floor.

Nature’s Head toilet vent
Then we cut the mesh off of a tea ball to make a bug screen. We made sure it was big enough to cover the screw holes. We used self-tapping screws to attach the flange to the bottom of the van. A marine-grade adhesive/sealant was used all around the flange to prevent moisture from getting in around the edge of the flange.
We then went back in the van and filled the space around the exhaust hose with Great Stuff Gaps and Cracks for insulation. Once dry, you can trim the top of the spray-on insulation as needed. The exhaust hose is now installed.
Nature’s Head Electrical Installation
The Nature’s Head Toilet can run on 12 volts (they also have an AC adapter plug if needed). The exhaust fan uses .07 amps to run. We estimated a distance of 20 feet to our fuse panel. Using Explorist.Life’s wire size calculator we determined we needed 16 AWG to accomplish this job safely. Nature’s Head recommends a fuse size of 2-5 amps, we used a 5 amp fuse in our electrical panel. To attach the wires, strip them to the correct length, clean them if necessary, and use Wago Splicing Connecters to connect the wires.
Securing the Toilet in the Camper Van
The Nature’s Head toilet comes with L brackets to attach to the floor. Since this toilet is sitting in the shower and we planned on moving it, we didn’t use them. Instead, we bought furniture gripping pads and placed them under the toilet. So far we haven’t had any issues with the toilet moving around as we drive.
Compost for the Nature’s Head Toilet
Typically peat moss or coconut fiber is used in these toilets. We use coco coir for our toilet since you can buy compressed blocks that don’t take up much space until they are hydrated. We place one block in a bucket and add 2 1/2 quarts of water. We let the coco coir soak in the water for 24 hours and it’s ready to go.
Installing the Urine Tank on the Nature’s Head Toilet
The tank is placed in the front part of the toilet. The toilet comes with a cap for your urine tank. Don’t lose it. Carrying a tank full of pee is way nicer when it’s capped. To put the tank in or take it out just undo the brackets on the side of the toilet and lift the top. To keep odors away we spray the pee area with vinegar diluted in water after each use.
Pee Funnel Installation
Another idea we got from Eamon and Bec’s second van build was the pee funnel. The pee funnel provides an easy way for Jess to go to the bathroom when we camp in appropriate areas. This is especially beneficial in the middle of the night or when our urine tank gets full.

Pee funnel and exhaust hose
Materials and Tools Needed:
- Multipurpose Long Stem Funnel (they also make specific female urination devices)
- Hose clamp
- 1/2 inch ID Tube 3/4 inch OD
- Great Stuff Gaps & Cracks Spray Foam
- Marine Sealant
- Spray Paint
- Deburring Tool
- Hole Saw - 7/8 inch
- Drill
- Tube cutter
- Flat Head Screwdriver
- Command Hook
To start figure out where you want to drill the hole in the floor for the tube to pass through. We did ours under the sink close to the hole we made for the composting toilet exhaust hose. We made sure the tube would not get in the way of the grey water jugs and that there was enough room to push the funnel under the sink when showering.
We then checked under the van to make sure the exit point would not hit anything or come out in the middle of a rib. We used a 7/8 inch hole saw to drill through the floor (do a test hole on spare wood to make sure the tube fits). Use a deburring tool to clean up the metal edges, and then use spray paint to seal the metal.
Once dry we figured out how much hose we would need. We had Jess stand where she would use the pee funnel and measure the desired distance from her to about 6-8 inches below the van. Next, we cut the tube.
We attached one end to the funnel with a hose clamp. We then installed a command hook on the shower wall to hold the pee funnel when not being used. We ran the tube back through the marine hatch hole and through the floor. Once in place, we used Great Stuff Gaps and Cracks to fill in the void space around the hole. We then added a marine-grade sealant around the outside edge.
Final Thoughts on the Composting Toilet and Pee Funnel
So far we have loved having the Nature’s Head composting toilet in our van. It’s easy to move in and out of the shower and the urine tank allows you to see how full it is, so you know when to dump it. The compost doesn’t smell when we have to empty it, and most importantly we have never experienced any unpleasant odor in the van while we’re on the road.
Curious about our van? Check out more of our van build guides.