
Camper Van Water System

Water tank, water pump, and accumulator
*Disclaimer: This post contains affiliate links. If you choose to make a purchase using one of our affiliate links, we will make a commission at no additional cost to you. Thank you for your support!
The water system in your camper van can be as simple as a couple of water jugs to having a full hot/cold system with a sink and shower. Either way, the water system in your camper van conversion isn’t as complicated as the electrical system; however, proper planning and research is still very important. We highly recommend fully designing your water system before starting installation, since there are a lot of variables to consider.
Once you've planned your water system, you can start the installation. You can use the links below to jump to specific sections of the installation process.
How big of a water tank do I need in my camper van?

32 gallon wheel well water tank
First you need to figure out how big of a fresh water tank you will need in your van. You might think just getting the biggest one you can find is the best solution, but 1 gallon of water weighs 8.34 pounds (3.75 kg) and you don’t want to overload your van. You need to estimate your daily water usage and how many days you want to go between filling your water tank.
Here is our experience with water usage:
- Drinking water: 1 gallon per person each day
- Dishes, hand washing etc: 3-4 gallons each day
- Showers: 1 - 1.5 gallons per person. If Jess washes her hair she uses closer to 3 gallons. Note that we are only using water to wet ourselves and rinse off. We don’t let the water run the whole time.
Check out this post for how we shower in our camper van.
Based on weight and water usage, we felt a 32 gallon tank was a good option for us. We typically need to fill our tank every 4-5 days.
The water tank we decided on was a custom tank from Agile Off Road that fits over the rear wheel well in our Sprinter van. The 32 gallon tank we have was discontinued and replaced with a new 36 gallon water tank. This tank can also be used on Ford Transit Vans and RAM Promaster vans. There are also tanks that fit in the spare tire rack under the van, or you can get a regular rectangular tank and put it in the van or mount it under the van. It all comes down to preference and space.
What’s the best water filter for my camper van?
Next you need to decide what type of water filtration system you want for your water system. The last thing you want to have happen is to get sick from the water you drink. A solid water filtration system is a necessity. There are tons of different filters on the market, but not all filters are equal.
When researching filters, you will see microns as a unit of measurement. This measurement is looking at how small of a particle the system can filter. For example, a grain of salt is about 60 microns. The most important measurements are the microns for bacteria and viruses. Bacteria are about 1-3 microns depending on the type. Viruses measure even smaller at 0.5 microns or less. Deciding how small of microns you want to filter out, depends on the level of risk you feel comfortable taking.
Inline Hose Water Filters

Camco Taste Pure Water Filter
The simplest type of water filters are inline hose water filters like the Camco Taste Pure water filter . This water filter uses sediment to filter out objects 20 microns or greater. This type of filter makes sure your water looks clear. RVs typically have these on their hose going into the water tank, but they usually have another filtration system inside.
UV Water Purifier
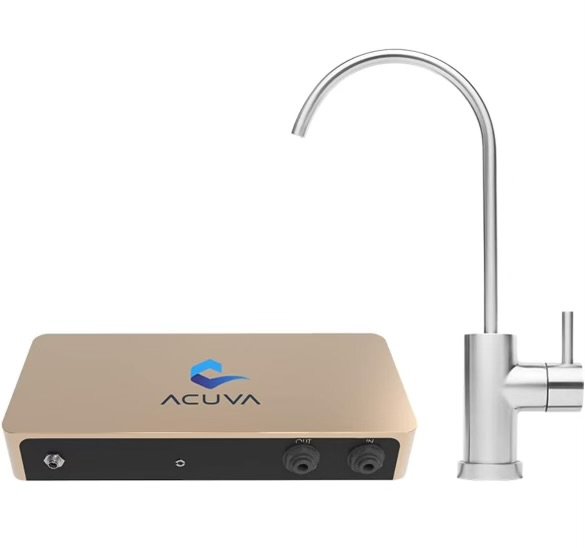
Acuva UV Water Purifier
Another option is a UV water purifier . These are a great option because they kill almost 100% of viruses and bacteria. Typically these are single point, as in just for the sink. Something to consider is some van lifers have had issues with these filters breaking in colder climates.
Berkey Water Filter

Royal Berkey Water Filter
Another option would be a basic setup like the Royal Berkey water filter . The Berkey is a gravity-fed filtration system that sits on your counter. You just pour water into the filter then dispose the filtered water out. This is great option for simple setups and can filter down to .2 microns. They have different sizes, but the 3.5 gallon one would be the best size for a camper van.
Clearsource Ultra RV Water Filter System

Clearsource Ultra RV Water Filter
The option we chose is the Clearsource Ultra RV water filter system. This system is bulky, but it is built to last. This system filters down to .2 microns (virus level) which is great. It also protects against heavy metals. The filters can process 2000 gallons before needing replaced. The Clearsource filter is the start of our plumbing system so all the water that goes into our system is filtered. The only down side to this filter is the cost, but for water filtration we felt it was worth it. The only downside is if our van is going to be sitting for a while, we have to remember to empty the tanks so we don’t have stagnant water. So far the Clearsource filter has been awesome and we have had zero issues.
What type of grey water tank should I use?

Grey water tanks under the sink
Grey water is water is the water that comes out of your sink and shower drains. Black water on the other hand is for human waste. Since we have a composting toilet, we don’t have to worry about black water tanks.
Grey water tanks are typically not as big as fresh water tanks. We went pretty basic with our grey water tanks and have two 7 gallon water jugs under the sink that are removable. We elected to keep our grey water tanks inside the van to help fend off freezing while in cold climates. We typically empty these tanks every 3-5 days, depending if we shower or not. Just like fresh water tanks, the size of your grey water tank along with water usage determines how often you need to empty it. You should only dump grey water tanks at designated grey water dumps.
You can also get grey water tanks that can be mounted underneath the van like this grey water tank. If you decide to go this route, make sure the tank will fit where you need it to go before you cut any holes in your van floor. We do plan to install one at some point to supplement the jugs, however it’s not a high priority because the 14 gallons we have has been getting the job done.
What type of water pump should I get for my camper van?
You will need a water pump to get water out of the fresh water tank and into the plumbing system. You can get a manual pump or an electric pump.
Hand and Foot Water Pumps
The most basic option is a manual pump such as a foot pump or hand pump. Hand and foot pumps are usually installed right near the faucet. This is a quick and easy way to accomplish the goal. However, since we wanted a shower in our camper van, a hand pump wouldn’t work for us.
Electric Water Pumps
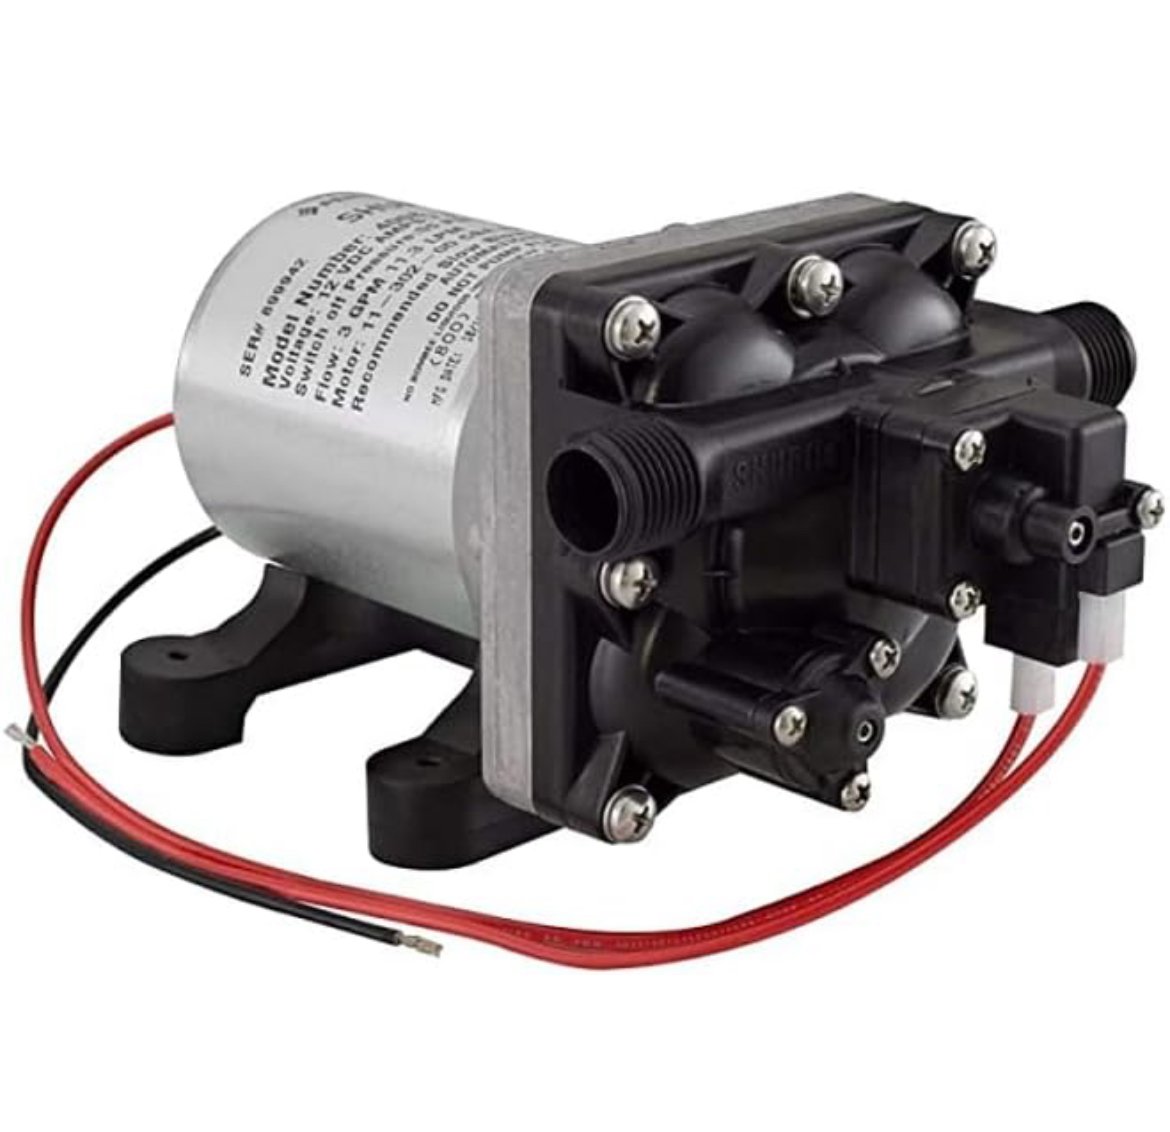
Shurflo water pump
We elected to go with a Shurflo diaphragm pump which is an electric pump. We chose a Shurflo pump because they are a very established brand in the RV water pump industry. The nice thing about this kind of pump is the water system is always pressurized and ready to go. This kind of pump will be a little more complicated to install because you will need to run electrical wiring and will need a few more parts, however we feel it’s worth it. One thing to note is the pump will run continuously if there isn’t any water in the system. We installed a switch to turn the pump on and off, so we could turn the pump off when the water system is empty.
The biggest complaint about these diaphragm pumps is the noise. Shurflo does make a silencing kit which we used in our build. You can still hear the pump, but it does reduce the noise. A lot of people use the silencing kit in their van conversion. Note that these pumps do not run all the time, only when there is a drop in pressure in the system.

Shurflo Accumulator
This isn’t a requirement in your water system, but we highly recommend the Shurflo accumulator . According to Shurflo “Shurflo’s Pre-Pressurized Accumulator Tank smoothes water faucet pulsations and reduces pump cycling to keep water line pressure up and pump motors cool. The Shurflo accumulator tank reduces plumbing system noise, increases the life of your pump and saves battery power.” All of this made sense to us. The last thing we want is to be hearing a pump run more than needed or replacing parts sooner. The accumulator should come pre charged. You can test the PSI on the nipple and, if needed, use a bike pump to increase the PSI to the manufacturer’s recommended PSI.
What type of water heater should I get for my camper van?
We prefer to have the option of hot water in our van. Some van lifers chose to not have this luxury. There are tons of camper van conversions without water heaters. Some who stay in warm climates, will even use a solar heated bag as their hot water for showers. We chose to install a water heater for comfort, especially since we plan to use our van in colder climates. There are a few different options for getting hot water in your camper van.
Propane Water Heater

Gasland propane water heater
A propane water heater is a great option for your van. You get instant hot water without using a ton of electricity. If we had installed our sink and shower near our stove, we would have probably chosen a propane water heater to save on electricity.
Electric Water Heater

Bosch 4 gallon water heater
We chose to have an electric water heater in our van. We have a 4 gallon Bosch Water Heater that we mounted near our fresh water tank. It typically take 15-20 minutes to heat the water up, and uses 15-20% of our batteries. We have a decent sized electrical system that can handle the electrical load, but if you have a small electrical system, and plan on having a propane system, I would lean towards propane water heater.
Hydronic Heating System
The newest option is a hydronic heating system. This is the most expensive option, but it’s pretty cool. It’s an all in one option that heats air, water, and can even be used for under floor heating. This system typically pulls its heat from the engine or uses fuel from your tank.
What type of pipe should I use in my van water system?

Pex-A water lines
Most people use either PEX-A (Uponor) pipe or PEX-B pipe for the water system in their van conversion. After debating back and forth between PEX-A and PEX-B, we elected to use PEX-A pipe for our water system. We would not recommend using any kind of stiff pipping such as copper in a van.
We chose PEX-A pipe for a few reasons. PEX-A is more flexible than PEX-B. PEX-A is installed by using cold expansion to join pipes together. This means the pipe is meant to expand. It also has memory and will contract back down. With water expanding 9% when it freezes, we felt this would give a better chance of not having pipes burst in colder climates. We also felt it would be easier to install in the tight places inside the van. PEX-A is a little harder to find and costs a little more, however, the connection pieces are cheaper than PEX-B. So far we have been happy with the PEX-A pipes and haven’t had any issues in below freezing temperatures. PEX-B is still a good option and lots of people use PEX-B in their camper van conversions.

Partially built water system
Installing the Water System
Before we start with the water system installation process, we have a few things to note. Make sure to pay attention to the type of threads on each component when building this system. The type of threads used in this water system are NPT (National Pipe Thread) which is tapered and does not require a washer, NPSM (National Pipe Straight Mechanical) which has female swivel connections, and GHT (garden hose threads) which does require a washer. If you’re not using the same type of threads, it can cause leaks in your system.
We used Blue Monster Teflon Tape on all our threaded connections. Make sure to tightly wrap it around the threads in the same direction the fitting will be turning. We wrapped it around the threads 4-5 times. This helps prevent leaks and makes sure we have water tight connections.
We have our vent line, drain line, and the water heater pressure relief line all going through the floor. Before using a hole saw to cut through everything, make sure you have your layout fully planned. You do not want a hole where the pump or water heater is supposed to be. Additionally, before drilling go underneath your van to make sure you won’t come out on a rib or something important under the van. We waited until the main components were installed and we were 100% sure on the layout before drill through the floor.
Prepping the Fresh Water Tank
Materials and Tools Needed:
If you look at the water tank, there are 1 1/2” threaded ports that need to be drilled out and 1/2” threaded holes that are pre drilled and capped by the manufacturer. The first thing you need to do is prep the fresh water tank by drilling out the holes for the fresh water fill, drain line, and water gauge (if you choose to have one).
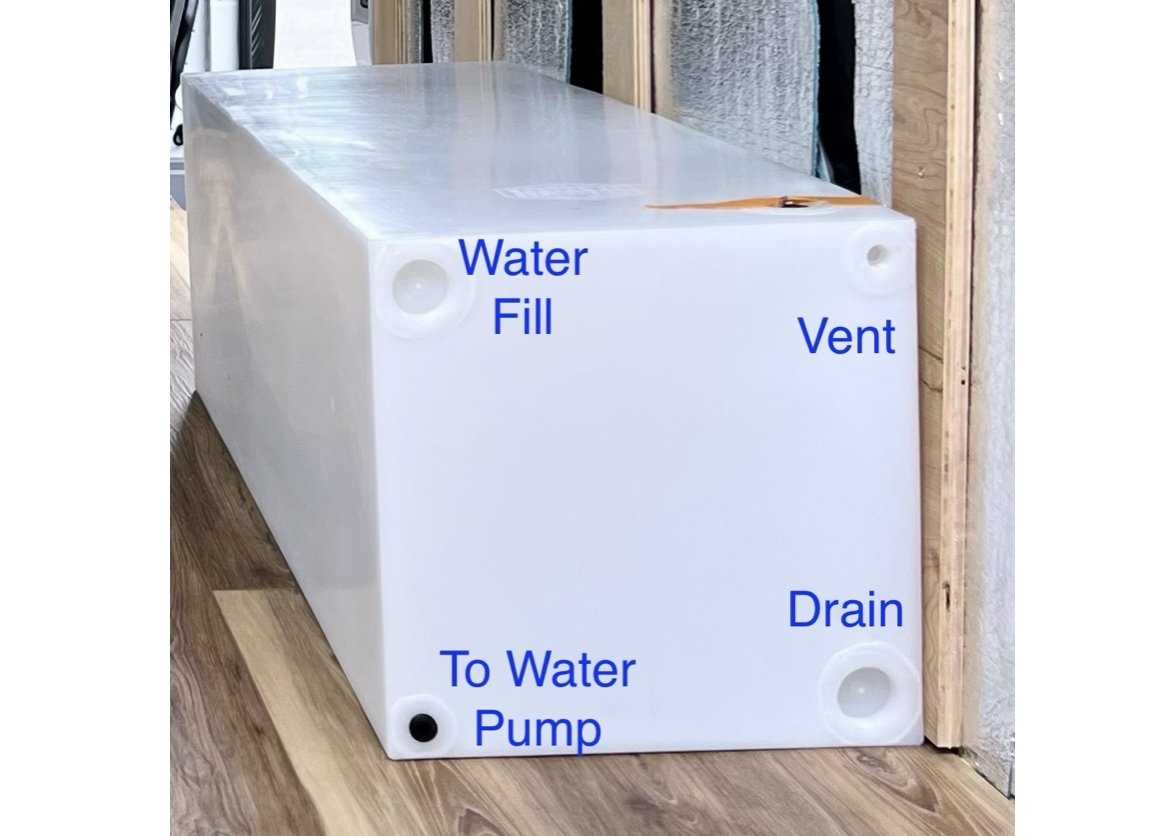
We used the top 1 1/2” port on the water tank for the water fill opening. Use a 1 3/4” hole saw bit to drill out the 1 1/2” port. If you plan on having a drain line for your fresh water tank, drill out the bottom 1 1/2” port. If you plan on having a water gauge (we don’t have one currently) drill out the 1 1/2” port on top of the water tank.
When you’re drilling the holes it’s very important to make sure the hole saw doesn’t hit the threads and damage them. Once are the holes are drilled, run some water through the tank to get rid of any leftover plastic from drilling. Once the tank is clean, move it back to the van.
Installing the Fresh Water Fill and Water Filter
Materials and Tools Needed:
- 50’ Flexible hose
- Clearsource Ultra Water Filter
- Shutoff valve
- Fresh water hose 3/4”
- RV Fill
- Blue Monster Teflon Tape
- 1 1/2” male NPT reducer to 3/4” female NPT
- 3/4” male NPT reducer to 1/2” female NPT
We filter our water through the Clearsource Ultra Water filter before it gets to the water tank. The water filter sits in the back of the van. All we have to do is open up the rear doors and attach a garden hose to the filter. We carry a 50 foot flexible hose to attach to a water spigot. The opposite side of the filter is connected to a shutoff valve then to a fresh water BPA free 3/4” diameter hose. This fresh water hose goes to a RV fill port with a check valve. The check valve prevents the water from back filling into the filter and making a mess. The other side of the RV fill port and check valve is a 1/2” (NPT) threaded male.


Since the opening on the tank is 1 1/2” we have to use adaptors to reduce it down to 1/2” so it can connect to the RV fill port. This was done by connecting a 1 1/2” male NPT adapter that reduces to a 3/4” female NPT adapter to the water tank. To get it down to 1/2” for the RV fill port, we used another reducer that was a 3/4” male NPT adapter to a 1/2” female NPT, which could then be connected to the 1/2” male NPT coming from the RV fill port.
Venting the Water Tank
Materials and Tools Needed:
The top 1/2” threaded port should be used as the vent line for your water tank. A vent line is necessary to help air escape when you fill your tank. If you don’t have a vent, the water tank can rupture from the pressure. Conversely, when water is let out of your tank, air needs to be able to fill the empty space so a vacuum effect isn’t created in the tank.
Currently our vent hose sits above our water tank and is looped a couple of times. The vent line then drops down and is vented through a hole in the van floor. This isn’t the most ideal setup since water could still easily get into the tube and block it if we aren’t careful. We recommend running keeping the vent line high and venting it through the wall instead.

Vent line hose connection to water tank. We had issues sourcing parts so we used a 1/2” male NPT to 1/2” Male NPT and then connected a 1/2” female NPT to 1/2” barb.
To connect the vent line to the water tank use a 1/2” male NPT to 1/2” barb adapter. This adapter allows us to connect the 1/2” ID hose to the adapter with a hose clamp. After connecting the vent hose, we looped it a few times above the tank and then dropped the end to the floor. We’ll discuss how to cut the hole in the floor later in the article.
Installing the Water Tank Drain Line
Materials and Tools Used:
- Blue Monster Teflon Tape
- 1 1/2” male NPT to 3/4” female NPT
- 3/4” male NPT to 3/4” male NPT shutoff valve
- 3/4 female NPT to 3/4” Barbed
- Hose clamp
- 3/4” Vinyl Braided Tube
- Flathead screwdriver
The bottom 1 1/2” port is used as a drain line for the fresh water tank. We use this a lot in the winter to quickly drain the tank after a trip. You don’t have to have a drain line, but it’s nice to have a quick way to dump water from your tank.
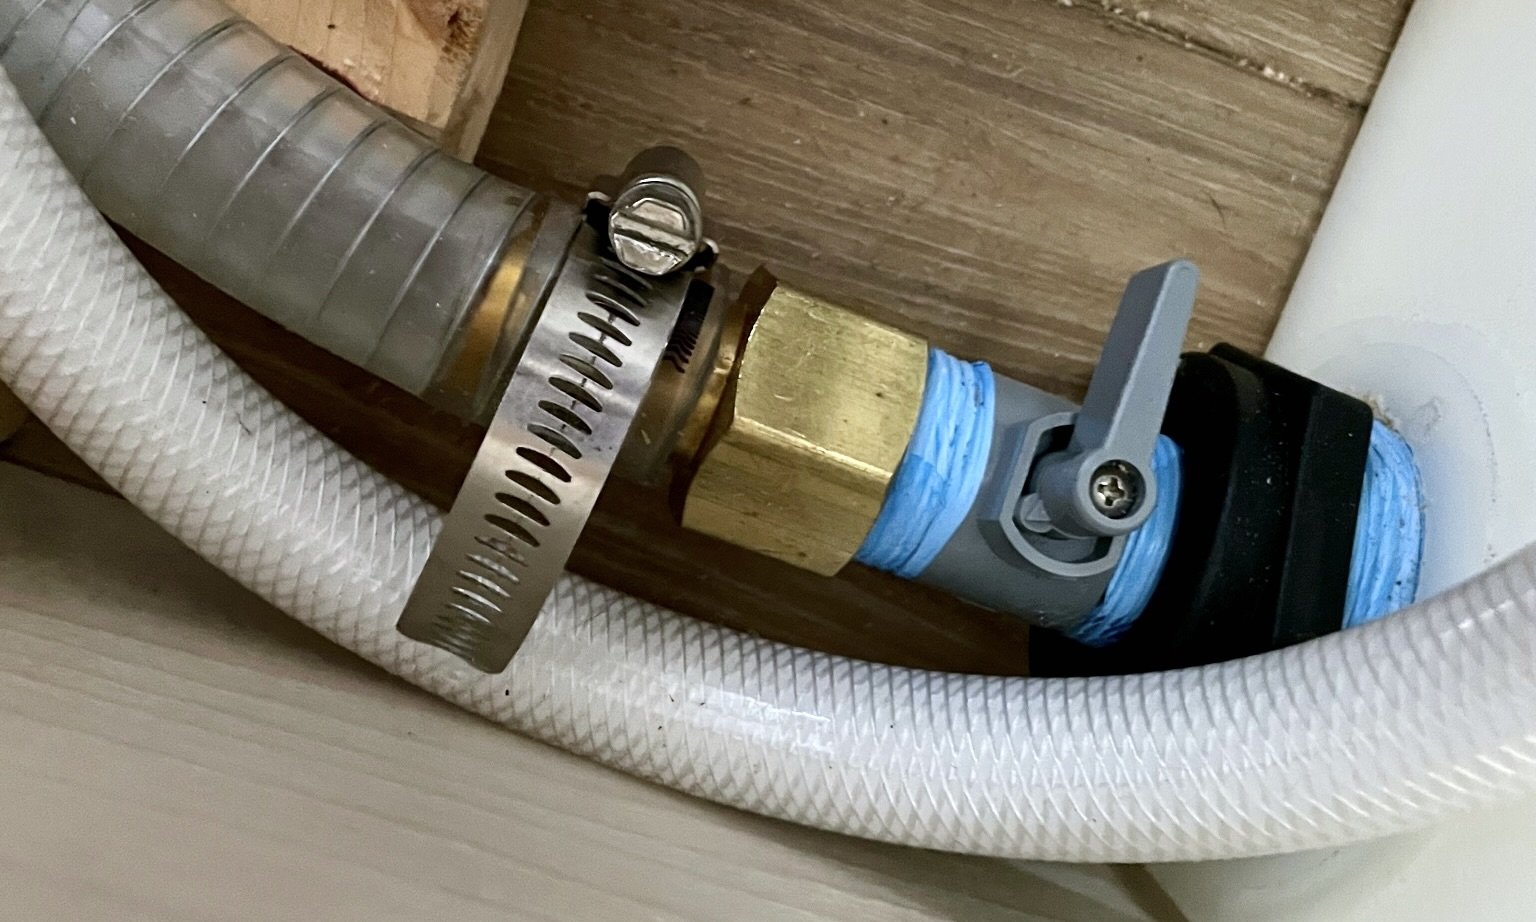
Drain line connection on water tank
We chose to use 3/4” vinyl braided tube for our drain line so we needed to reduce the 1 1/2” port down. To accomplish this we attached a 1 1/2” male NPT to 3/4” female NPT to the water tank port. Then a shutoff valve is placed inline with a 3/4” male NPT to 3/4” male NPT. This then connects to 3/4” female NPT to a 3/4” barb adapter. We used a hose clamp to connect a 3/4” braided vinyl tube and ran it down through the floor. Now you have a way to quickly drain your tank. We’ll discuss how to cut the hole in the floor later in the article.
Installing the Water Pump

Shurflo silencing kit, Shurflo strainer, Shurflo water pump, and Shurflo accumulator
The bottom 1/2” threaded port is used for the line leading to the rest of the water system. To get water from the tank to the pump, we started with the Shurflo silencing kit. Connect a 1/2” male NPT to 1/2” male NPT to the port in the water tank. Then connect the silencing kit hose to the other side of this fitting. The hose then attaches to a Shurflo strainer which attaches to the Shurflo pump. A double female swivel is then used to connect the pump and the Shurflo accumulator.
Make sure to test your accumulator to make sure it’s set to the right pressure using the port on top (should be preset to 30 PSI). A regular PSI gauge and bike pump can be used for this. After the accumulator you need to attach a 1/2” female NPSM adapter to 1/2” Pex-A fitting. We didn’t realize that we needed a NPSM adapter instead of an NPT adapter here and had some issues with leaking until we realized what the issue was.

Electrical wiring on Shurflo pump
The water pump runs off the 12V electrical system. As mentioned earlier in this post, the pump will run continuously if there isn’t any water in the system. Instead of running the pump wiring directly to the fuse box, we installed a switch to turn the pump on and off, so we could turn the pump off when the water system is empty. We ran our duplex wire from the fuse block to an on/off switch located in an upper cabinet that is easily accessible inside the van. The duplex wire was then run to the pump. See our electrical system article for more about proper wiring.
Installing Pex-A Water Lines
Materials and Tools Needed:

Pex-A water lines in our water system
We connected 1/2” Pex-A pipe to the adapter after the accumulator to run lines to the water heater and the rest of the water system. The Pex-A lines connect with Pex-A fittings and expansion rings. We initially bought a manual tool that creates the expansion necessary to get the fitting into the pipe, however, the tight spaces inside the van made it very difficult to use this tool. After a lot of frustration (and tears from Jess), we ended up biting the bullet and getting the Milwaukee Pex Expander tool. This tool was pricey, but we felt it was well worth the cost and made the process much quicker and easier to make leak free connections.
To make a connection with Pex-A, cut the desired length of pipe using Pex pipe cutters. Make sure your cuts are as straight as possible. Angled cuts can cause leaks. Place an expansion ring on the end of the tube. Make sure the tube is flush with the inside of the ring.
Using the 1/2” fitting on the expansion tool, test the expansion tool. The tool should expand while the head rotates. The Milwaukee tool will rotate for you, but if you are using the manual tool you really have to watch to make sure the tool is rotating. The rotation is important so the tube expands evenly on all sides.

Once you have the hang of using the tool, now you can try connecting the Pex-A to a fitting. Place the fitting inside the Pex-A pipe with the expansion ring. Expand and rotate the tool 6-8 times to expand the pipe and ensure it is fully seated on the cone. Then immediately place it on the fitting. The fitting clip should be flush with the expansion ring, otherwise it can leak. Continue this process for all your Pex-A connections.
The instructions said to expand and rotate the tool 5 times, but we found it didn’t expand the pipe enough to get the fitting all the way on. It took us a couple tries to get this right so make sure you have plenty of expansion rings and fittings in case you mess up.
Installing the Water Heater
Materials and Tools Used:
- Bosch 4 gallon water heater
- 1/2” Pex A to 1/2” female NPT elbows x 2
- 3/4” male NPT to Pex-A 1/2”
- Blue Monster Teflon Tape
- Joint Compound
Since we wanted hot water in our van, we chose to install a Bosch 4 gallon electric water heater. To accomplish this we had to run Pex-A lines from the accumulator to the water heater. Note, if you choose not to have a water heater, you can run your Pex-A lines directly to the next part of your water system.
Since we wanted both hot and cold water, we used a T fitting in our Pex-A line to split the cold water between the water heater and the rest of the water system. Note that all the blue pipes in our van are cold water and the red pipes are hot water, however, you can choose to use the same color pipe for both hot and cold if you want to.


The Pex-A pipe is fed to the water heater and connected with a 1/2” female NPT to Pex-A elbow attached to the blue fitting on top of the water heater. We connected this elbow to the water heater with teflon tape and joint compound. Connect a 1/2” NPT to Pex-A the same way on the red fitting on the opposite side of the heater. Then connect your red Pex-A pipe to this fitting for your hot water lines.
The water heater also has a pressure relief valve that sits on top of the heater (the 3/4” female NPT in the middle). Since we want to minimize the amount of moisture in the van we want to vent this pressure relief valve outside the van. We connected a 3/4” male NPT to Pex-A fitting and then ran the Pex-A tubing through the floor to let the moisture out on the outside of the vehicle.
Vent Line, Drain Line, and Pressure Relief Line
Materials and Tools Used:

At this point we knew where all our main components were in the water system and could drill our hole for the vent line, drain line, and pressure relief line. We used a hole saw to drill a hole through the floor big enough to run all 3 lines through. Once the hole is cut, paint the inside of the hole with spray paint to cover any exposed metal. Once the paint is dry, put all 3 lines down the hole. Fill in the hole with Great Stuff Gaps and Cracks spray foam. We then went underneath the van and used a marine grade sealant to make sure moisture wouldn’t get in from below.
Running Pex-A Lines to the Shower and Sink
Materials and Tools Used:
- 1/2” Pex-A pipe
- Pex-A Expansion Rings
- Pex-A Expansion Fittings
- Pex pipe cutters
- Manual expansion tool or Milwaukee Pex Expander tool
- Pex-A shutoff Valves
- Shower
- Sink
- Outdoor hose
Next we ran the hot and cold Pex-A water lines towards our shower and sink. We placed shutoff valves in the middle of this run for both the hot and cold water lines. Shut-offs valves are important because they allow you to make repairs in your water system without dumping all your water. In hind sight, we should have placed a shut-off valve at the water tank where the water comes into the system as well.

Plumbing for shower mixer and shower head
Our water lines run to the shower mixer first. T fittings are used to allow the lines to continue to the sink and quick connect hose. The hot and cold lines are attached to the Delta universal shower valve with a 1/2” female NPT to Pex-A fitting. This fitting was used for the cold water line, hot water line, and for the line from the mixer to the shower arm for the shower head. We used a Pex-A drop elbow to 1/2” female NPT to connect the pipe coming from the mixer to the shower arm.

Pex-A to shutoff valve to sink lines
The cold and hot water continue on to the sink. Each Pex-A is run to an elbow with a shutoff valve that has a 3/8” compression fitting. The lines from the sink faucet are attached to this fitting. Our sink faucet came with preattached water lines so all we had to do was screw those lines to the fitting.
The hot water line ends at the sink and the cold water lines continues to the quick connect hose sprayer. The Durafaucet quick connect hose sprayer has a 1/2” male NPT connection. We used a 1/2” female NPT to Pex-A to connect the cold water line to the fitting.
Once everything was connected, we filled the water tank and tested the water system for leaks. We found we had a few leaks that had to be fixed. One was because we used the wrong threads on the adapter after the accumulator. The others were leaks at Pex-A fittings because the pipes weren’t lined up properly. After fixing all the leaks, we are happy to report that we have not had any issues after both winter and summer van trips.
Grey Water System
Materials and Tools Used:
- 7 gallon jugs x 2
- Camco Flexible Drain
- 3/4” GHT quick connect male GHT female GHT
- 3/4” female GHT to 3/4” male GHT elbow x 2
- 3/4” female GHT cap
- 3/4" male GHT to 3/4" male GHT
We have two 7 gallon Reliance water jugs under the sink for grey water. We chose to put our grey water under the sink since we use our van in the winter, and we didn’t want the grey water lines to freeze if we had a tank under the van.


Our sink came with a standard 1 1/2” drain. We attached the drain to the sink. Then we attached the Camoco flexible drain. The Camco attaches to any 1 1/2” standard drain and is an alternative to the standard P-trap drain you would find under the sink in a house. The P-trap can capture debris and prevents odors from coming back up the sink. The drain is then connected a 3/4” GHT quick connect fitting. The other side of the quick connect fitting is connected to 3/4” GHT elbow which screws into the lid on the Reliance water jugs.
For the jug not connected to the drain, we put a cap on the elbow so water can’t get out while we’re driving if the jug is full. This jug has the same elbow and male quick connect as the first jug. We then took the quick connection with a female GHT and added a 3/4” male GHT to 3/4” male GHT. We then added a cap to the 3/4” male GHT. This setup allows us to easily pop the cap off when we swap out the jugs.
Final Thoughts on Our Water System
That’s the entire fresh water system in our camper van. So far we are very happy with our fresh water system. We’ve taken our van skiing in below freezing temperatures and down plenty of bumpy roads, and we haven’t had any issues with leaky or burst pipes in our van so far. When we aren’t using our van, we winterize our water system by draining our water tank, emptying our pipes, and leaving the faucet and shower head open.